
Page published 20 January 2021
 Sanding Down: Part Eighteen
1 April 2011
Today was Friday and the Pussycat died! For those who haven't followed this tale of preparing Imagination for painting I should explain that the Pussycat is, or perhaps was, a 600w 150mm diameter orbital sander that had been lent to me by my sailing buddy, Ian.
The day had started normally enough. I was as late to the boat as ever. In fact, I broke my previous record, not arriving at the boat till 17:00. That's because I had been shopping, doing washing and ironing and other domestic chores after my sister had departed yesterday. I had also needed to make the place ready for Diana who was due to arrive for the weekend.
Sanding the Foredeck is Completed
Originally, I had not been expecting Diana till 21:00 and a 17:00 start would still have left a couple of hours of suitable daylight to do something worthwhile. However, a change in appointments meant she brought that forward. I had been keen to get to the boat to finish off the foredeck and had been hopeful that I might be able to get at least some of the cockpit sole done before the weekend.
Yesterday, I had after sorted out all the tricky areas with the Detail Sander, leaving either side of the fore hatch and the bow to be done with the Pussycat. Then it was going to be a choice about whether I should tackle the cockpit sole or the three cabin sides with windows, the last two main areas of the boat to be completed.
I say "main areas" because there are a number of nooks and crannies on the boat that will have to be done by hand, the various grooves - the fore hatch, cabin door and the cockpit bench drains - and the part of the bow made unreachable by the winch arm on the trailer, for example. As well as that there are the removable sections the fore hatch, cabin door and cockpit lockers.

Sanding the Cabin Sides Begins
I had decided to attempt the cockpit, so the glazing to the cabin could be left as long as possible before removal. I didn't want too much rain finding its way into the cabin where it might do damage to the cabin interior. However, Diana's early arrival meant that wouldn't happen. So, after completing the foredeck, instead I tackled the outside of the cabin "wings", the raised parts of the gunwale in the cockpit where they join the cabin. I completed the starboard wing without complication, but the second or third time I pulled the trigger to start up the Pussycat while tackling the port wing and it simply failed to start.
It was getting late and I needed to get home and shower before Diana arrived, so there was little time to investigate the problem. All I could do was check the electricity supply. I switched to the Detail Sander. That worked fine, so I finished off the port wing with that and packed up for the weekend.
I'll take time to look in the Screwfix catalogue over the weekend to see if they have an equivalent and how much it costs. After all the hammer I have given the Pussycat, it probably is only fair that I do more than Ian suggested by way of recompense for using the sander - returning it with at least as many disks as he supplied with it.
Sanding Down: Part Nineteen
6 April 2011
Oh woe! After all my initial moans about it, how I miss the dead Pussycat!
My attempted post mortem over the weekend achieved nothing - other than leading to the discovery that somewhere I have lost the main arm from my socket set, along with a 17mm socket. I have vague memories of trying to undo a large nut but still can't remember what or where, so have no idea about where I might look for it. It's strange, because I'm usually so careful about putting away my sockets. It must mean I was rather stressed or hurried when I last used the set.
I arrived at 15:00 for today's session and worked through till 19:00 and probably achieved less than on any previous occasion. I started on the cockpit sole. The mould for the cockpit sole appears to have included a sheet of faux leather glued to its surface. However, the sheet did not cover the entire surface of the sole. Instead it is about an inch short of all four sides and has neatly rounded corners. The result is that there is a shallow channel all round the edge of the cockpit just a couple of millimetres deep. Perhaps this was a deliberate feature to create a drain. Whatever the thinking of the manufacturers it is a pain when it comes to removing paint. This channel is two narrow for my Detail Sander to operate in and I was in constant danger of sanding away the crisp edge to the "leather sheet". This is why it took me three hours to complete sanding of the one inch strip round the edge of the cockpit.
Without a working Pussycat I turned to the next sander that Ian has lent me to tackle the main leather-look surface of the sole. This is a 400w 125mm diameter orbital sander. I have christened it "The Bee". Compared with the Pussycat, which let out a low purr by comparison, The Bee has an agitated high pitched buzz. I confess I do worry about whether Ian will get any of his sanders back in working order by the time I finish the job!
Sanding the Cockpit Sole of Imagination
The Bee buzzed into action. Well, it buzzed. I can't say there was much action to it, so it took most the fourth hour to complete a little bit more than four square feet and three sanding disks. I am likely to run out of them before I'm half way through the cockpit sole at this rate. It looks like they'll have to be another trip to Norwich to buy some more disks before I start my next session.
So, overall, this is not good news. I really had hoped that I would finish the sanding by the end of this week, but I begin to doubt that I will achieve it. Even the weather was too good! I began to yearn for the cold grey days of a month ago. Then I didn't end the session with an aching back, after having been bent double working at floor level for four hours, while baking in the sun!
Sanding Down: Part Twenty
7 April 2011
I recall estimating that there was forty hours sanding to be done after my first session. Today should have seen that target reached, but there's still the hatches, cabin front and sides, and the various little grooves to be done that where the sanders won't go. Yes! Today I managed to finish the cockpit sole. However, it didn't turn out to be the straight forward job I expected.
I spent the morning tidying up the front garden and then, after lunch, I made a trip into Stalham. The shop I had planned to visit, to order some new curtains, proved to be shut by the time I arrived. Does Stalham really still follow that old institution of "Early Closing Day" or have I just picked a shop with irregular hours? Even if I had not undertaken the morning's activities and after lunch excursions, I still seemed to be all behind hand again and the Credit Card slip records the time as 16:13 when I was issued with the new sanding disks in Screwfix at Norwich.
I felt I had to go to town as I'd started my third disc in doing the first four square feet yesterday and had used all the coarser sheets, so I feared progress today might prove even slower without some additional discs. At Screwfix, there seemed to be two types on offer of the right size. The first seemed similar to those which I was romping through, so I opted for the other type, which cost some 25% more but did specifically mention paint, as well as other tougher sounding jobs, rather than the "general sanding" capability of the cheaper ones.
Half an hour later I was in the cockpit of Imagination. I put on the first of my new discs and certainly the initial results were impressive. The Bee did seem to be cutting through the paint as well as the Pussycat would have done. Twenty minutes later, I was surprised to find the disk separating from the sanding head. I picked it up and reapplied it to the Velcro hooks on the pad of the sander. Weird! There was no adhesion! The disc almost seemed to float off the head. I tried a new disk. That worked, so at least, it wasn't the hook surface that had failed. The second disk only lasted marginally longer. Luckily the third disk lasted till I'd finished the job. I certainly was not impressed with these premium discs - or is there some secret I should know about what discs to use or how to use them?
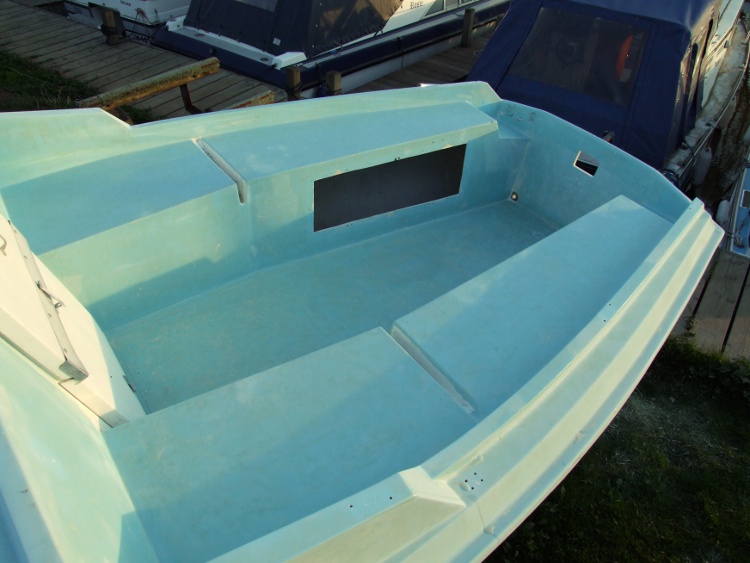
The Cockpit Sole now back to the gel coat!
As I discovered yesterday, it was not possible to get right into the corners of the cockpit with The Bee, so I had to turn to the Detail Sander for the last few square inches in each corner. However, that part of the task was easy and quickly achieved. I think I have done a reasonable job on the sole. I don't think I have taken too much of the leather grain finish off, but it does mean that there are streaks of white left in the deeper groves that form the pattern.
Tomorrow, I plan to seek guidance. Should I remove the aluminium framing from round the windows or not? I am conscious of all the advice that states that two-pack and ordinary paint don't mix. I am concerned that if I don't remove the framing bars there will be some left left tucked behind the bars that will react with the two-pack to be applied and I risk scratching the pars and spoiling their appearance.
If I do remove the bars I might end up having to do a full removal and re-bedding or the perspex, either because I'm advised to, to avoid any risk of getting paint on the perspex, or because, without the framing bars, the perspex will recover from the bend it has been held in for the last five years, break the seal and force me to re-glaze the windows.
I guess it's all a question of doing a really good job or doing what you can get away with. We shall see...
Sanding Down: Part Twenty One
10 April 2011
I was to spend the weekend in Kenilworth so I made an early start on Friday. Shortly after getting to Imagination I saw Tim, who I hope will be the one to do the work on the boat once he his happy with my preparation.
I asked him about the aluminium framing round the windows and whether I should remove it or not. As expected there was no question in his mind but that the framing bars should be removed. He was less concerned about the issue of the perspex then being free to lose its bow and pop out of the window. The perspex would be masked, and if it did pop out then so be it. It could easily be re-fitted was the attitude. We also discussed when it was likely that room could be found for Imagination in the shed. As I feared, it seems likely that it won't now happen until after Easter.

Sanding the Cabin Doors complete!
After that it was just a question of pressing on with the sanding down. I choose to do the two parts of the cabin door. This required that all ironmongery was removed, a job that was quite straight forward. The problem turned out to the the wretched sanding discs that I had bought for The Bee. One of them lasted little more than five minutes for the loop pile on the back lost all adhesion. However, when they worked progress was made at a reasonable speed. Having arrived around 14:45 I was gone by 17:45 with the two parts to the door done.
The delay in being able to get into the shed removes a little of the pressure. I am confident that things will be fully ready by Easter, withe not only the basic sanding done, but also the small blemishes in the hull filled as required. and smoothed ready for the paint.
Sanding Down: Part Twenty Two
13 April 2011
Wednesday, and I finally get to the boat again. I'm on to the awkward bits now!
Although I manage to do a little bit of the threshold under the cabin door with The Bee, it's mainly tackled with the Detail Sander. I was most of the way through before I finally came to realise that I'd been using the disc for far too long (Can you call it a disc when it's a shape somewhere between a triangle and a 50p piece?) and I'd be better off with a new one. With that fitted things did improve, but the increase in speed didn't last for long and I was then truly onto the awkward bits.
I opted to do the deep drains on the cockpit benches first. First I tried using an old disc from the Pussycat. I dug it in the groove with my fingers and cursed because I realised that I had forgotten to bring the sponge sanding blocks. My cry of anguish attracted John at work on his neighbouring boat. He supplied me with one instantly, insisting that I need not return it when done. I did try it for about one stroke, with the sanding disc wrapped round it, but decided it was a little too thick for the groove.
The trouble was, while it might help me do the sides of the groove acceptably, it was never going to be able to reach to the bottom and do the curve there, so I rejected it and tried to return it to John. But he was having none of it. I did take up another of John's ideas. For the first time I wetted the disc and used my fingers to stuff it in the groove and rub.
I was surprised. My previous experience with wet 'n' dry had taught me that the abrasive would get clogged in no time, but this time it worked excellently. I was able to make steady progress on the starboard groove and then I turned to the port bench. After completing both grooves I started work on the port side of the cabin door. I managed to finish that and the very two small machine-inaccessible areas on the cabin roof, just before 19:00, having arrived at about 15:15.

The awkward bits around the Door and Bench Drain are finished!
It seems a long time to complete such a small area, but I was satisfied. If I can get in a couple more good afternoons work this week, it should be ready, or very nearly ready for the paint shed before Easter and that means it should be ready for the water very soon after that.
My only worry now is that a pile of sand is due to arrive at home tomorrow, ready for me to pay a patio. A couple of fence panels complete the order, which I am going to have to trim to fit. If I work on the patio and the fence in the mornings I may not feel up to the sanding task in the afternoons - but still, there's always a good part of the evenings now!
Sanding Down: Part Twenty Three
18 April 2011
I think that it's the first time I'd managed to get to the boat on a Monday. I was feeling guilty that I hadn't done more last week but what with the forthcoming bank holidays I felt I needed to do some catching up. Unfortunately, things didn't go so well. As ever, I arrived late. A record late, according to John, who was closer to going home than arriving.
First I tackled the remaining part of the cabin doorway, the bit I'd managed to hide in last Wednesday's photograph. I remained impressed with the ease that the paint softened and rubbed away when tackling it by hand and with water, but it did seem to get through the abrasive quite quickly. The other great advantage was that I didn't get covered in dust so didn't need to struggle into the overalls.
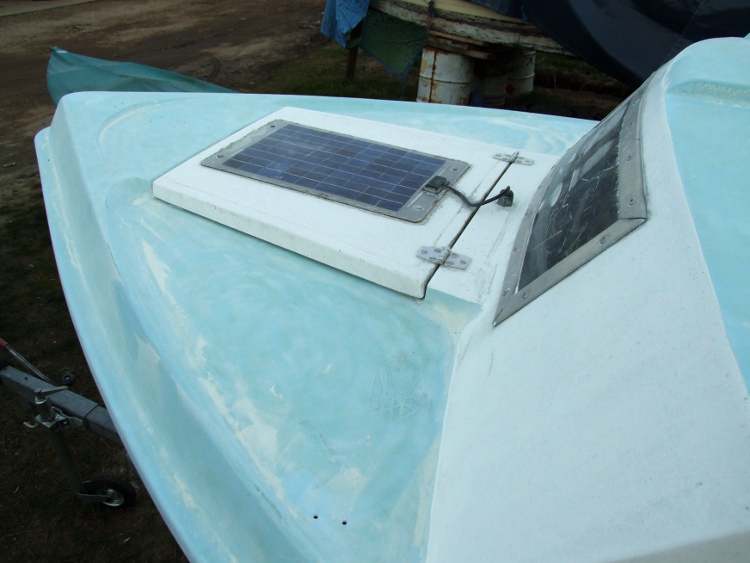
Then it was on to the fore hatch. The first thing to do was remove the solar panel. Oops! I had forgotten my tools. Once more, John came to my rescue and supplied a small screw driver to disconnect the panel from the charge controller inside the cabin.
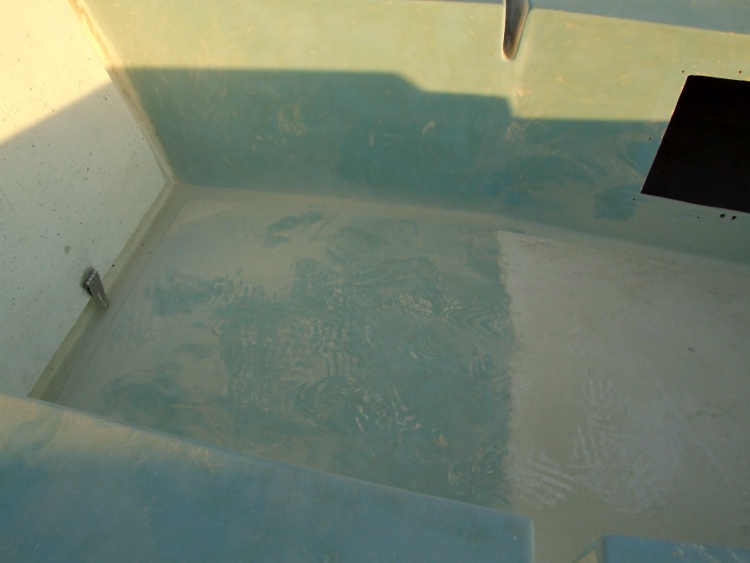
Once in the cabin I realised that things would need more attention than I had thought. When I discovered that the bilges were filled with water I had found last year's new installation, the switch gear for the navigation lights and 12volt socket had had come adrift. Now I realised that the conduit for the cable was also loose. It seemed that the general dampness over the winter had loosened much of the paint and I had glued all this stuff over existing paint.

Starting work on the fore hatch
I did have the tools to undo the hinges and the hatch cover was soon free. Like the cockpit sole, it has a mock leather raised panel on its main surface. I used the "Bee" on it - with water! It didn't splash too much and it cleaned away the paint with reasonable speed. However the edge proved to be a problem. I wasn't able to get the Detail Sander to get right into the angle round the edge of the raised panel and I ended the evening with the panel incomplete, which was a bit of a disappointment.

Sanding the cabin door
Just to prove that cabin doorway is finished, I thought I'd add a photo of that as well!
Sanding Down: Part Twenty Four
19 April 2011
I can't imagine that I'm going to be able to get any work done on Imagination on tomorrow and on Thursday I'll be packing for the weekend, if I'm not doing more work on the patio in the back garden, but that's another story - so it was important to get something done today or my timetable would really slip badly.
This time I did remember to take the right tools and was able to remove the hinges from the hull. That meant I could then strip the paint from the grooves around the hatch.

Sanding the fore hatch completed
Once more I used the Detail Sander, but this time dry. It still was not easy to get into the corner round the edge of the raised mock leather panel but at least the job was done. Now all that is left is the sides around the three cabin windows. I'm hoping that drilling out the rivets will be easy and that I'll be able to use the Bee with confidence right around the edge of the perspex. If that is so I should be able to get the job finished in a long single session. As it now stays light until 20:00 that shouldn't be an impossible task.
Of course, I still need to factor in the time to do the two "bins" that I have at home which are the cockpit lockers. I still have to do those as well.
I had a conversation today about when there might be a slot in the shed for the painting. There wasn't too much worry about that, I was told, but it did make me realise that I had developed a blind spot to the reality of the task. If there are to be several coats applied, with some reasonable drying time between them, it may not turn out to be the forty eight hour job that I had got into my head that it would be. It could be a job that occupies a full week.
That conversation made me realise that it might be better to try and get some of the work that's to be done inside the cabin out of the way before Imagination moves into the shed. Not only that, by the time I sort out the inside of the cabin and get all the gear back on the boat after the repaint, it will probably be the middle of May before I'm back on the water. Not what I originally had in mind!